Here at Lifegoals4u I thought I had covered everything when it came to creating a successful blog and generating money. One topic important to new bloggers that I may have missed covering is how to buy your web hosting and domain name.

Many new bloggers make the mistake of buying hosting from unreliable companies, and they regret this misstep later. In this step-by-step guide, I will share everything you need to know to buy reliable web hosting and domain names, and I will demonstrate the process by actually buying them for this tutorial.

To begin, head over to www.Bluehost.com and click on “get started now”.
This will take you to a page where you will see three different packages from which to choose. I will quickly explain the various packages, but you should also read this guide to get a deeper understanding of what these packages offer.
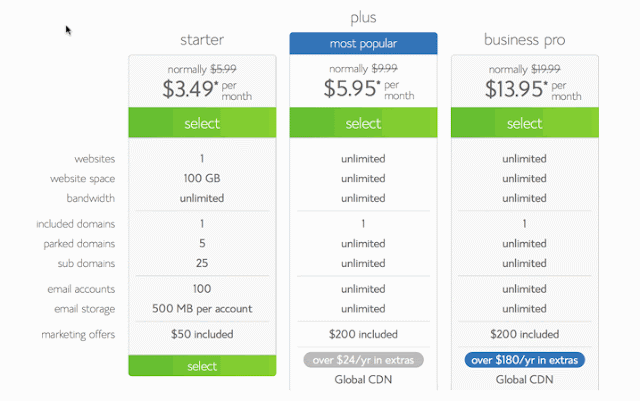
Unless you are someone who needs the Business Pro package, I recommend that you buy the Plus package, as you can host additional blogs on the same hosting service in the future. Remember, the link that I have provided at the end of this post will get you a significant discount, but this discount is only for the first bill. So remember that you will see far greater savings by purchasing hosting for a two or three-year term.
Click on “select” in front of the plan you have chosen. Since I’m buying hosting for this tutorial only, I have selected the starter plan for 12 months.
Choose free domain, or use your existing domain name:
On the next page, you can either choose to get a free domain name from Bluehost, or you can use any of your existing domain names.

Complete hosting purchase:

Before you make your payment, I suggest that you scroll up and verify all of the information. By default you will see the option to make payment via credit card only, but if you want to make payment via PayPal, click on “More payment options” and it will reveal the Pay by PayPal option as well. Use the payment option you are comfortable with, and after making the payment you will see another after sale page like the one below, which you can ignore. Click on “complete” at the end.

On the next page, you will see the confirmation for your hosting purchase, and you will see a screen like the one below. Click on “create your password”:

Selecting the password:
This is the final stage of your web hosting purchase, as you simple need to set the password for your hosting login. You can choose your password, or you can use a password generator to create a complex password, which I recommend. Copy and paste the password at any safe place, and click on “paste”. Click on “create”, and that’s it! The process of buying the web hosting service for your blog is 98% complete.

Logging into web hosting cPanel:
Check your email inbox, and you will find a confirmation email with all the login information for your web hosting. The only thing that will not be included in the email is the password you created in the last step — this is for your security.


On the next page click on “Home”, and you will be at the Bluehost cPanel. That’s it! Congratulations! You have just purchased your first web hosting and domain name. Here is a video which will give you a demo of Bluehost’s cPanel and dashboard:
www.shoutmeloud.com/buy-web-hosting-domain-name.html

For the purpose of this tutorial I will be using Bluehost, which is a top recommended hosting service for WordPress blogs. An excellent bonus with Bluehost is the fact that you will get one free domain name that will save you money right from the start, and this will allow you to manage everything from one place. This is a detailed guide, so I suggest that you grab a cup of coffee and get ready to buy your first web hosting and domain name.
Before we begin, here are a couple of things you need to have in preparation:
Domain name:
A domain name is like your network address. This is the address of your blog or website. You will get one free domain name with Bluehost, or you can use any of your existing domain names if you already have purchased some. (Even if you don’t need the free domain name now, you can use it later.) If you have not yet decided on your domain name, this guide will be helpful to you, or you can also use a free service called BustAName to find cool domain names for your blog.
Payment mode:
When purchasing your web hosting and your domain, you can make the payment via credit card, debit card or PayPal.
Step-by-step guide to buying a web hosting service:
This will take you to a page where you will see three different packages from which to choose. I will quickly explain the various packages, but you should also read this guide to get a deeper understanding of what these packages offer.

- Running only one site: buy Starter package
- Running more than one site: buy Plus package
- Need SSL and dedicated I.P: buy Business Pro package
Unless you are someone who needs the Business Pro package, I recommend that you buy the Plus package, as you can host additional blogs on the same hosting service in the future. Remember, the link that I have provided at the end of this post will get you a significant discount, but this discount is only for the first bill. So remember that you will see far greater savings by purchasing hosting for a two or three-year term.
Click on “select” in front of the plan you have chosen. Since I’m buying hosting for this tutorial only, I have selected the starter plan for 12 months.
Choose free domain, or use your existing domain name:
On the next page, you can either choose to get a free domain name from Bluehost, or you can use any of your existing domain names.
Remember that you can use your free domain name later, if you don’t need it now.
If you are using an existing domain name, you need to change the Name-server to:
NS1.Bluehost.com
NS2.Bluehost.com
If you want to keep things simple, enter the domain name you wish to buy in the “new domain” field, and your free domain will be activated with the web hosting. Click on “next”, and from here the remaining steps will be very simple.
Account Details:
In this section, you need to enter your details (name, email address, address), all of which is straight forward. Make sure you verify every detail (especially your email address), as your login and hosting information will be sent to your email address.
Package information:
This part is crucial, and you should pay extra attention here to make sure that you are not overcharged for add-ons that you do not need.
Choose the hosting package for the 24 or 36-month term. You will notice that the price decreases as tenure increases.
Be sure to deselect the options “Site Backup Pro” and “Sitelock Domain security”, as you don’t really need them. I would prefer to give you a free alternative to these in upcoming articles.
Complete hosting purchase:
On the next page, you will see the confirmation for your hosting purchase, and you will see a screen like the one below. Click on “create your password”:
This is the final stage of your web hosting purchase, as you simple need to set the password for your hosting login. You can choose your password, or you can use a password generator to create a complex password, which I recommend. Copy and paste the password at any safe place, and click on “paste”. Click on “create”, and that’s it! The process of buying the web hosting service for your blog is 98% complete.

Check your email inbox, and you will find a confirmation email with all the login information for your web hosting. The only thing that will not be included in the email is the password you created in the last step — this is for your security.
Go to Bluehost, and click on “Login” at the top. In the login field type your domain name or username, and in the password field type the password which you have chosen or generated.

www.shoutmeloud.com/buy-web-hosting-domain-name.html
No comments:
Post a Comment